
Why Modeling Chocolate Is a Must-make Recipe
When I first discovered modeling chocolate, I realized it was a game changer for my baking projects. It’s incredibly versatile, allowing me to create stunning decorations that look professional without the hassle.
Unlike fondant, it’s rich and delicious, enhancing the overall flavor of my cakes. I love how easy it’s to shape—whether I’m crafting flowers or wrapping a cake, it holds its form beautifully.
Plus, it’s simple to make at home, which means I can customize it to my liking. If you’re looking to elevate your baking, you’ve got to try making modeling chocolate!
Ingredients of Modeling Chocolate
When you’re ready to plunge into the world of modeling chocolate, the first thing you need is a list of ingredients. Trust me, having everything you need at your fingertips makes the process so much smoother—like a well-buttered pan. Plus, it’s always satisfying to check items off a list, right?
So, here’s what you’ll need to gather for that glorious modeling chocolate bliss.
- 7 ounces bittersweet chocolate, chopped (200 grams)
- 1/4 cup light corn syrup (60 ml)
- 7 ounces semisweet chocolate, chopped (200 grams)
- 3 1/2-4 tablespoons light corn syrup
- 7 ounces white chocolate, chopped (200 grams)
- 1 1/2-2 tablespoons light corn syrup
- 7 ounces milk chocolate (200 grams)
- 2 1/2-3 tablespoons light corn syrup
Now, before you start melting that chocolate, let’s chat about the ingredients a little more. The type of chocolate you choose can really impact the flavor and texture of your finished modeling chocolate.
Bittersweet chocolate brings a deep, rich taste, while semisweet offers a little sweetness without being overpowering. White chocolate? Oh, it’s like that friend who adds a little fun to every gathering—sweet and delightful!
And don’t skimp on the corn syrup; it’s the magic glue that holds everything together. Just remember to grease your measuring cups before using the syrup, or you might end up wrestling with it like it’s a stubborn jar of pickles. Nobody wants that.
How to Make Modeling Chocolate

Alright, let’s plunge into the delightful process of making your very own modeling chocolate. First things first, you’ll want to grab your 7 ounces of bittersweet chocolate, chopped (that’s about 200 grams for all you metric fans out there).
The best way to start is by melting that chocolate—use a double boiler or a metal bowl set over a pan of simmering water. Just make sure the bowl doesn’t touch the water. You don’t want a hot tub party for your chocolate! Stir it gently until it’s melted and smooth, then remove it from the heat. Let’s not rush; we want it to cool a bit, so give it a moment.
Once it’s cooled down a smidge, it’s time to bring in the magic ingredient: 1/4 cup of light corn syrup. The moment you stir that syrup in, you’ll notice the chocolate stiffening up like a kid who just spotted a vegetable on their plate. Keep stirring until it’s all combined.
Now, the real fun begins! Transfer this chocolaty goodness into a sturdy plastic freezer bag and pop it in the fridge for about two hours. This is the part where you can twiddle your thumbs and maybe contemplate your life choices—like why you didn’t start this earlier in the day.
After two hours, your chocolate should be firm and ready to work with. Take it out and knead it until it’s soft and pliable. If it feels like a brick, don’t worry, just cut off small pieces and knead those until they feel right. It’s like giving your chocolate a little workout.
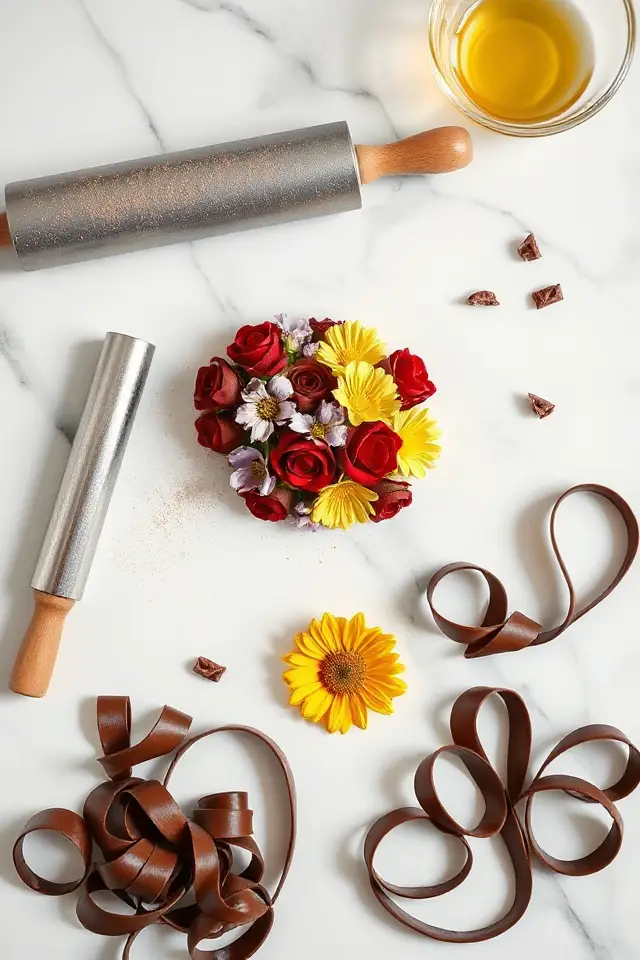
Make sure to grease your counter with some oil or spray it with Pam, or you’ll be wrestling with your dough like it’s a particularly stubborn kitten. Now, you can shape it however your heart desires—ribbons, flowers, or even a little sculpture. Remember, this is your moment of creative bliss.
And if your modeling chocolate gets a bit hard to handle later on, just knead in a touch more corn syrup, and you’ll be back in business. Happy crafting!
Modeling Chocolate Substitutions & Variations
Now that you’ve mastered the art of making modeling chocolate, let’s explore some exciting substitutions and variations to expand your creative options.
If you’re craving something different, try using white chocolate for a sweeter treat or bittersweet chocolate for a rich flavor. You can also experiment with flavored chocolates, like mint or raspberry, to add a unique twist.
For a dairy-free option, look for vegan chocolate and adjust the corn syrup accordingly.
Want a colorful touch? Just add gel food coloring to your melted chocolate before mixing in the corn syrup.
The possibilities are endless—let your imagination run wild!
What to Serve with Modeling Chocolate
While modeling chocolate is a versatile and delightful treat on its own, pairing it with complementary desserts can elevate your creations to new heights.
I love serving it alongside rich chocolate cakes or creamy cheesecakes, as the textures and flavors harmonize beautifully. Fresh fruit, like strawberries or raspberries, adds a revitalizing contrast that balances the sweetness.
You might also consider cookies or brownies for a delightful dessert platter. If you’re feeling adventurous, drizzle some warm caramel or chocolate sauce over the top for an indulgent finish.
These combinations not only impress but also enhance the overall dessert experience!
Additional Tips & Notes
To guarantee your modeling chocolate turns out perfectly every time, it’s essential to pay attention to a few key details.
First, always use high-quality chocolate; it makes a significant difference in texture and flavor. When measuring corn syrup, grease your measuring cup to prevent sticking. If your dough feels too hard, don’t hesitate to knead in a bit more corn syrup to soften it.
Remember, workspace matters—grease your surface to avoid sticking. Finally, store your modeling chocolate well-wrapped in an airtight container; it can last for months.
Keep these tips in mind, and you’ll create chocolate wonders effortlessly!